Our First Big DIY Win at the Cottage: The Bench Build
While I was making my niece's Tinkerbell Tutu and bedazzling items for my other niece’s Halloween costumes, our den/tv room became overwhelmed with rhinestones, tulle scraps and sewing tools. With a background in performing arts it's not uncommon for me to be creating something while Sean and I are watching a show. In fact I have a hard time not multi-tasking. A life in a non-profit will do that to you, IYKYK.
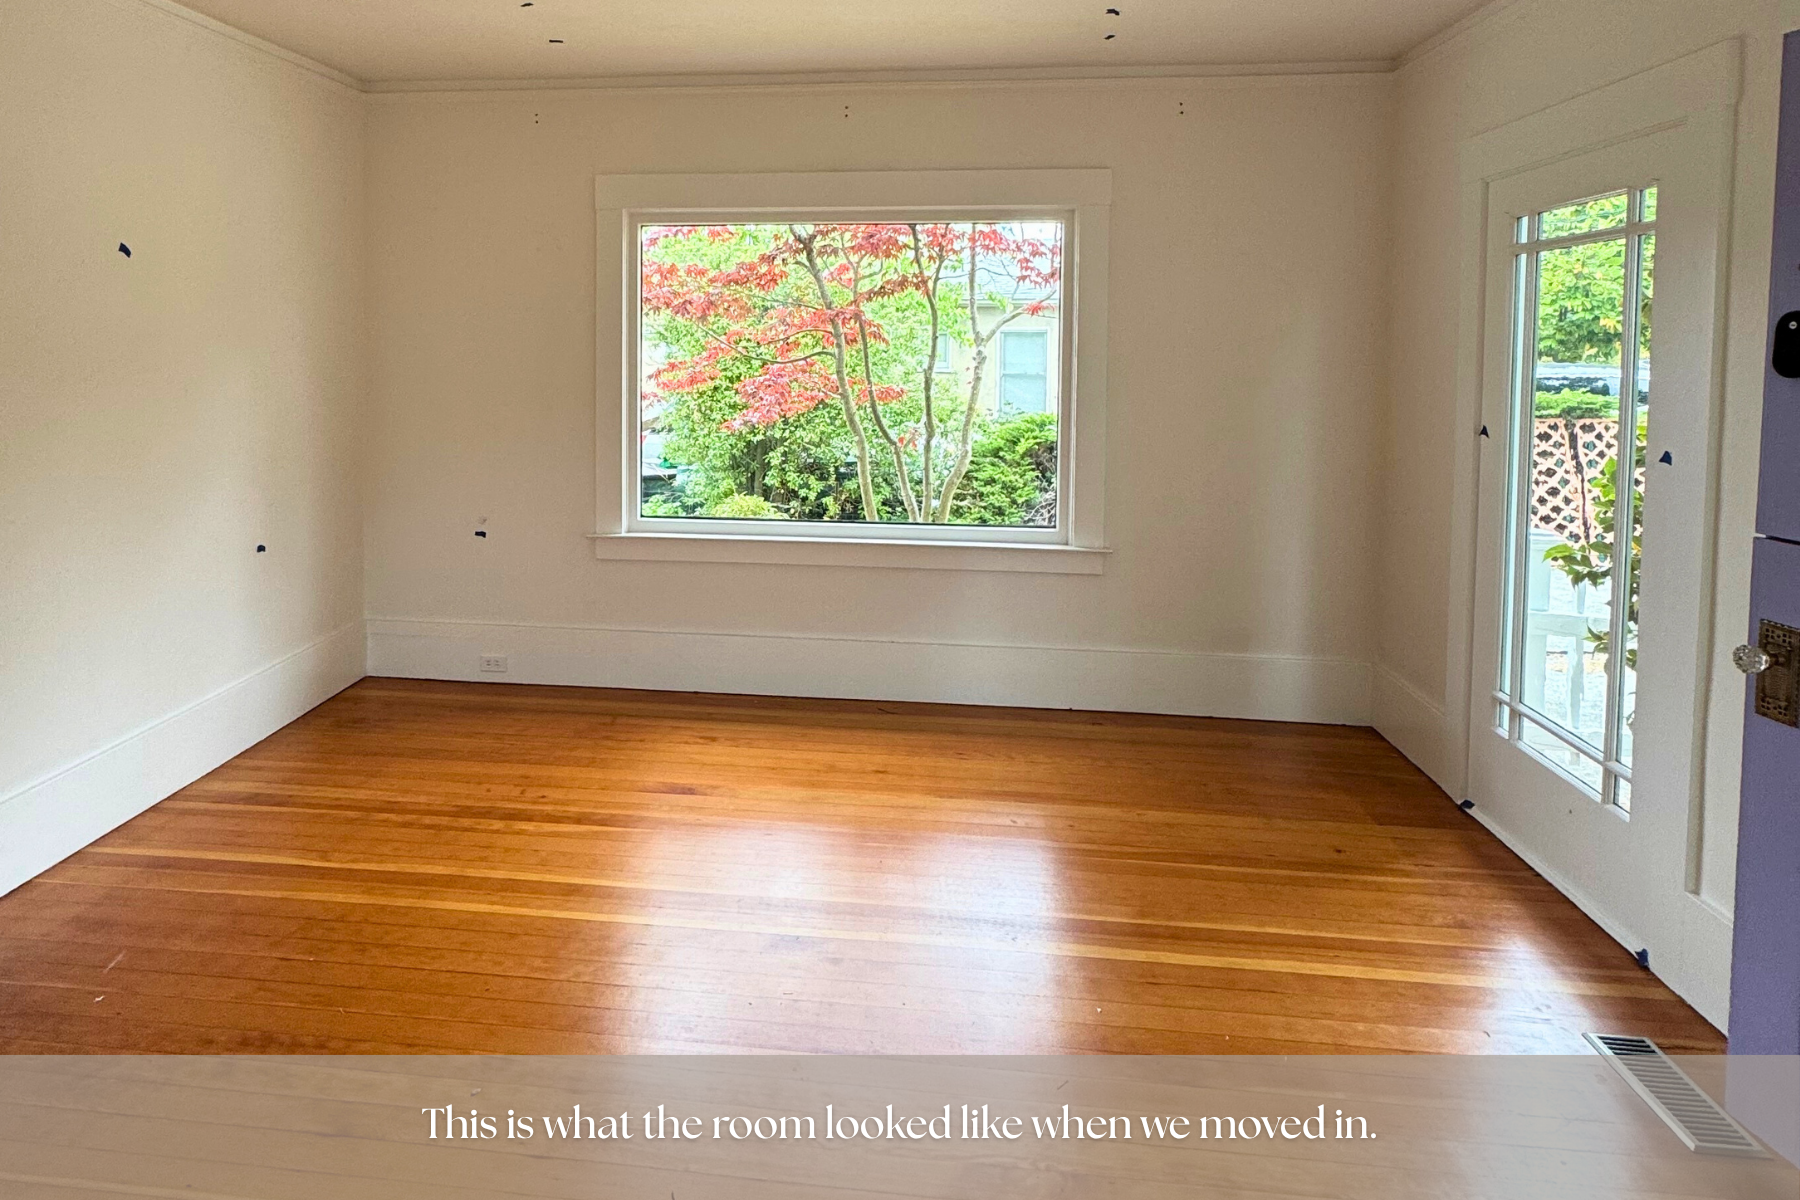
Anyway, it became clear that I needed a space to craft. The couch cushions were eating my gems and glitter was getting everywhere. We had a smaller table in our kitchen that we would sit at for breakfast, but it always felt maybe a little too large for the space. We decided to move it out to our entry way/living room. I liked the idea that I would have a designated space to craft... but knew I would ultimately need a place to store my craft items to eliminate mess and clutter. They were currently being stored in the den/tv room.
At this point Sean and I were still mulling over the other side of the living room, the left/fireplace spot was beautifully put together and was being utilized more and more each day. It wasn’t until we had the family over for a Halloween Party that the concept of a bench came to full fruition. All 15+ of us were outside on the deck eating pizza when I realized our dining room was not going to cut it to have the entire HEK clan over for dinner. I also love to host and have a desire to plan several parties at our home throughout the year where I can dive into my party decor dreams.
So what do we do? Glad you asked. Multi-purpose bench build coming at ya.
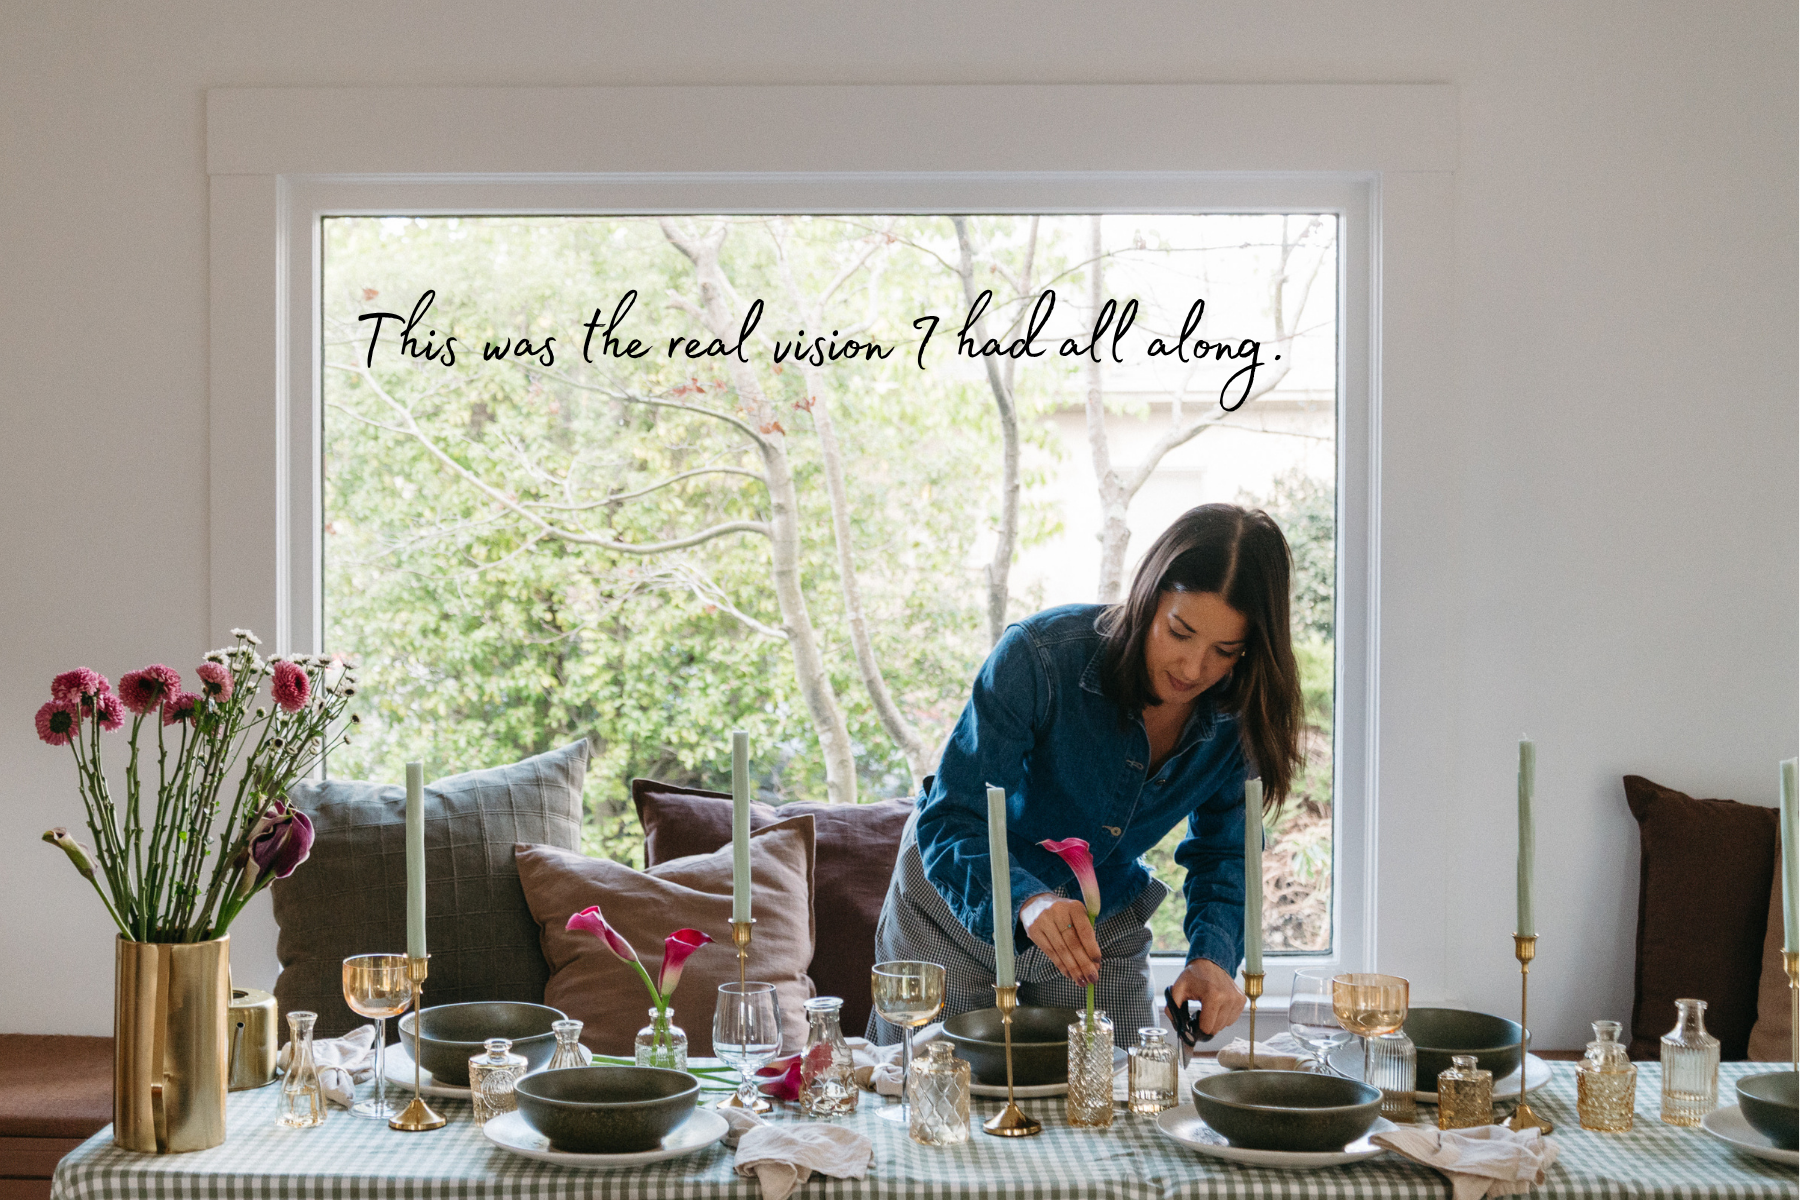
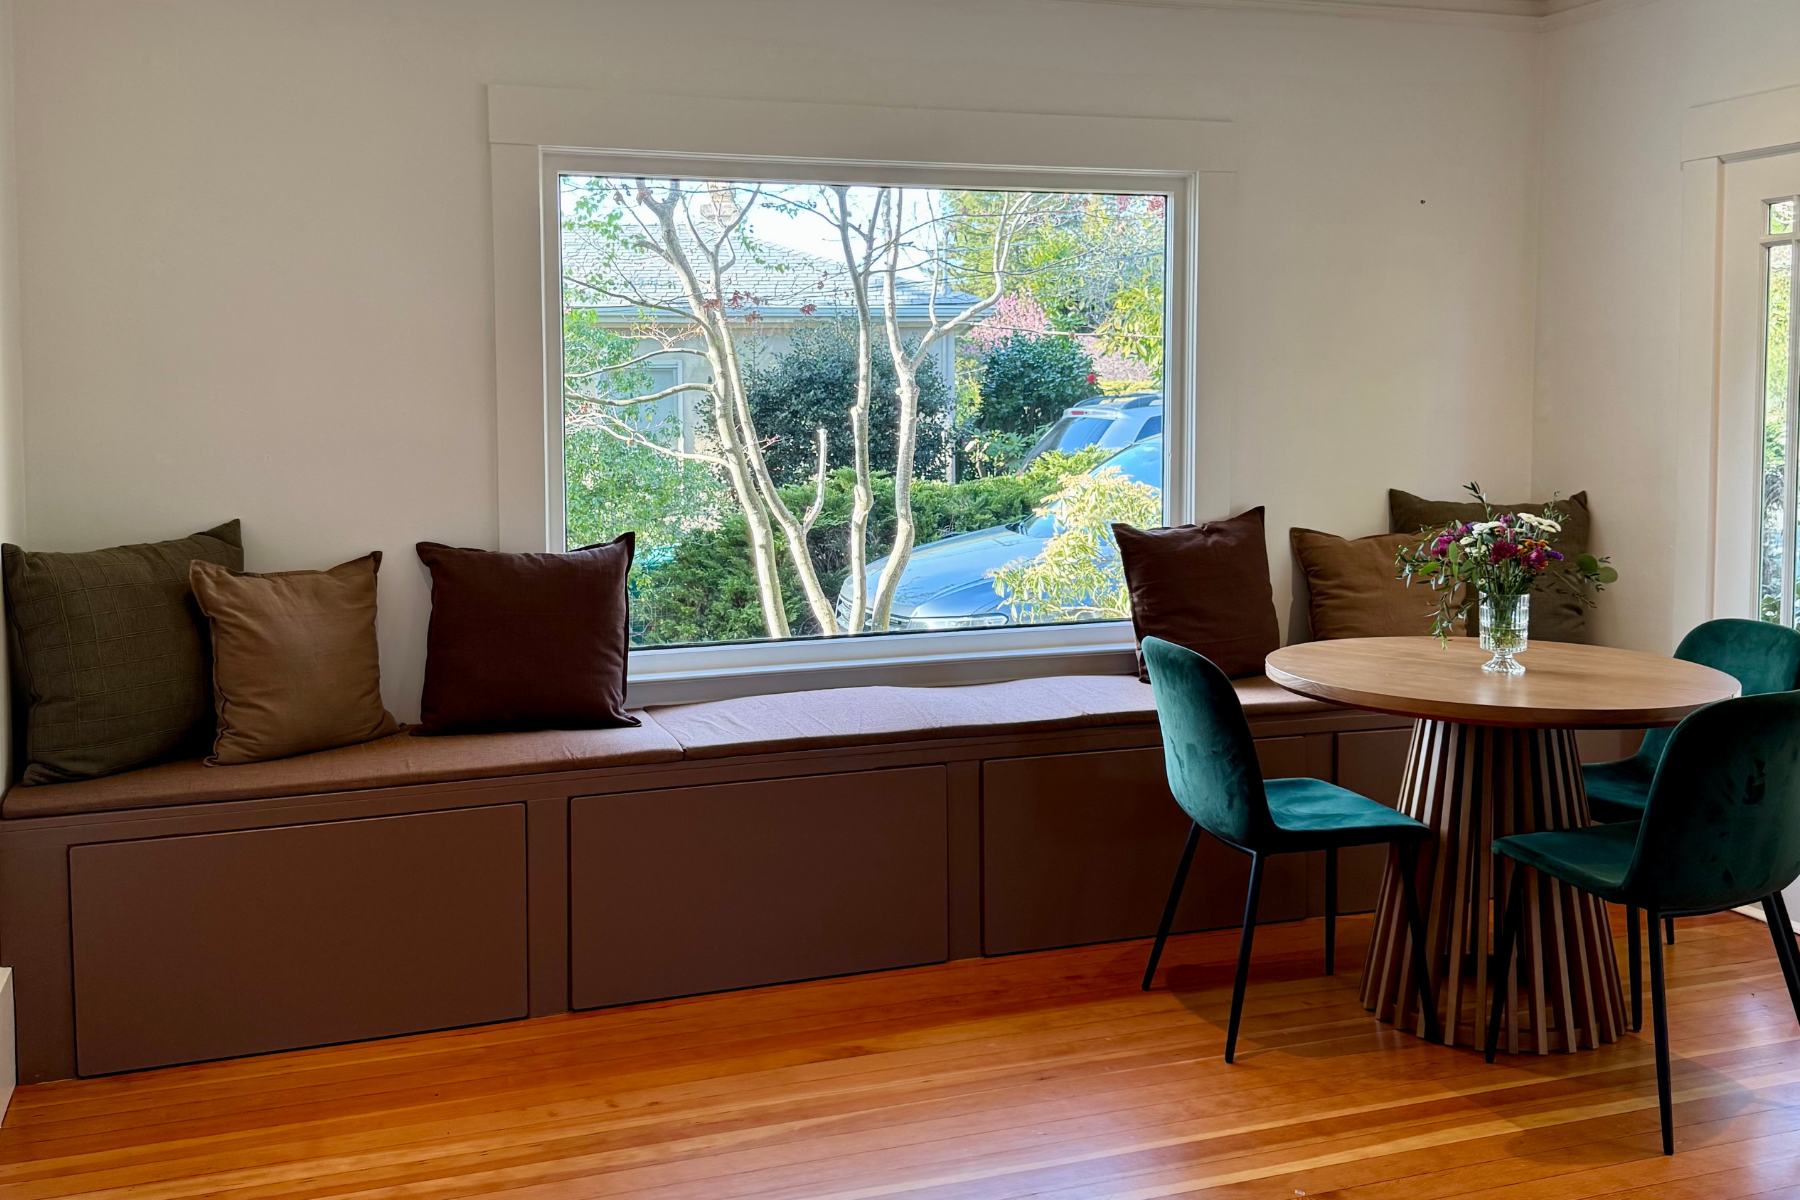
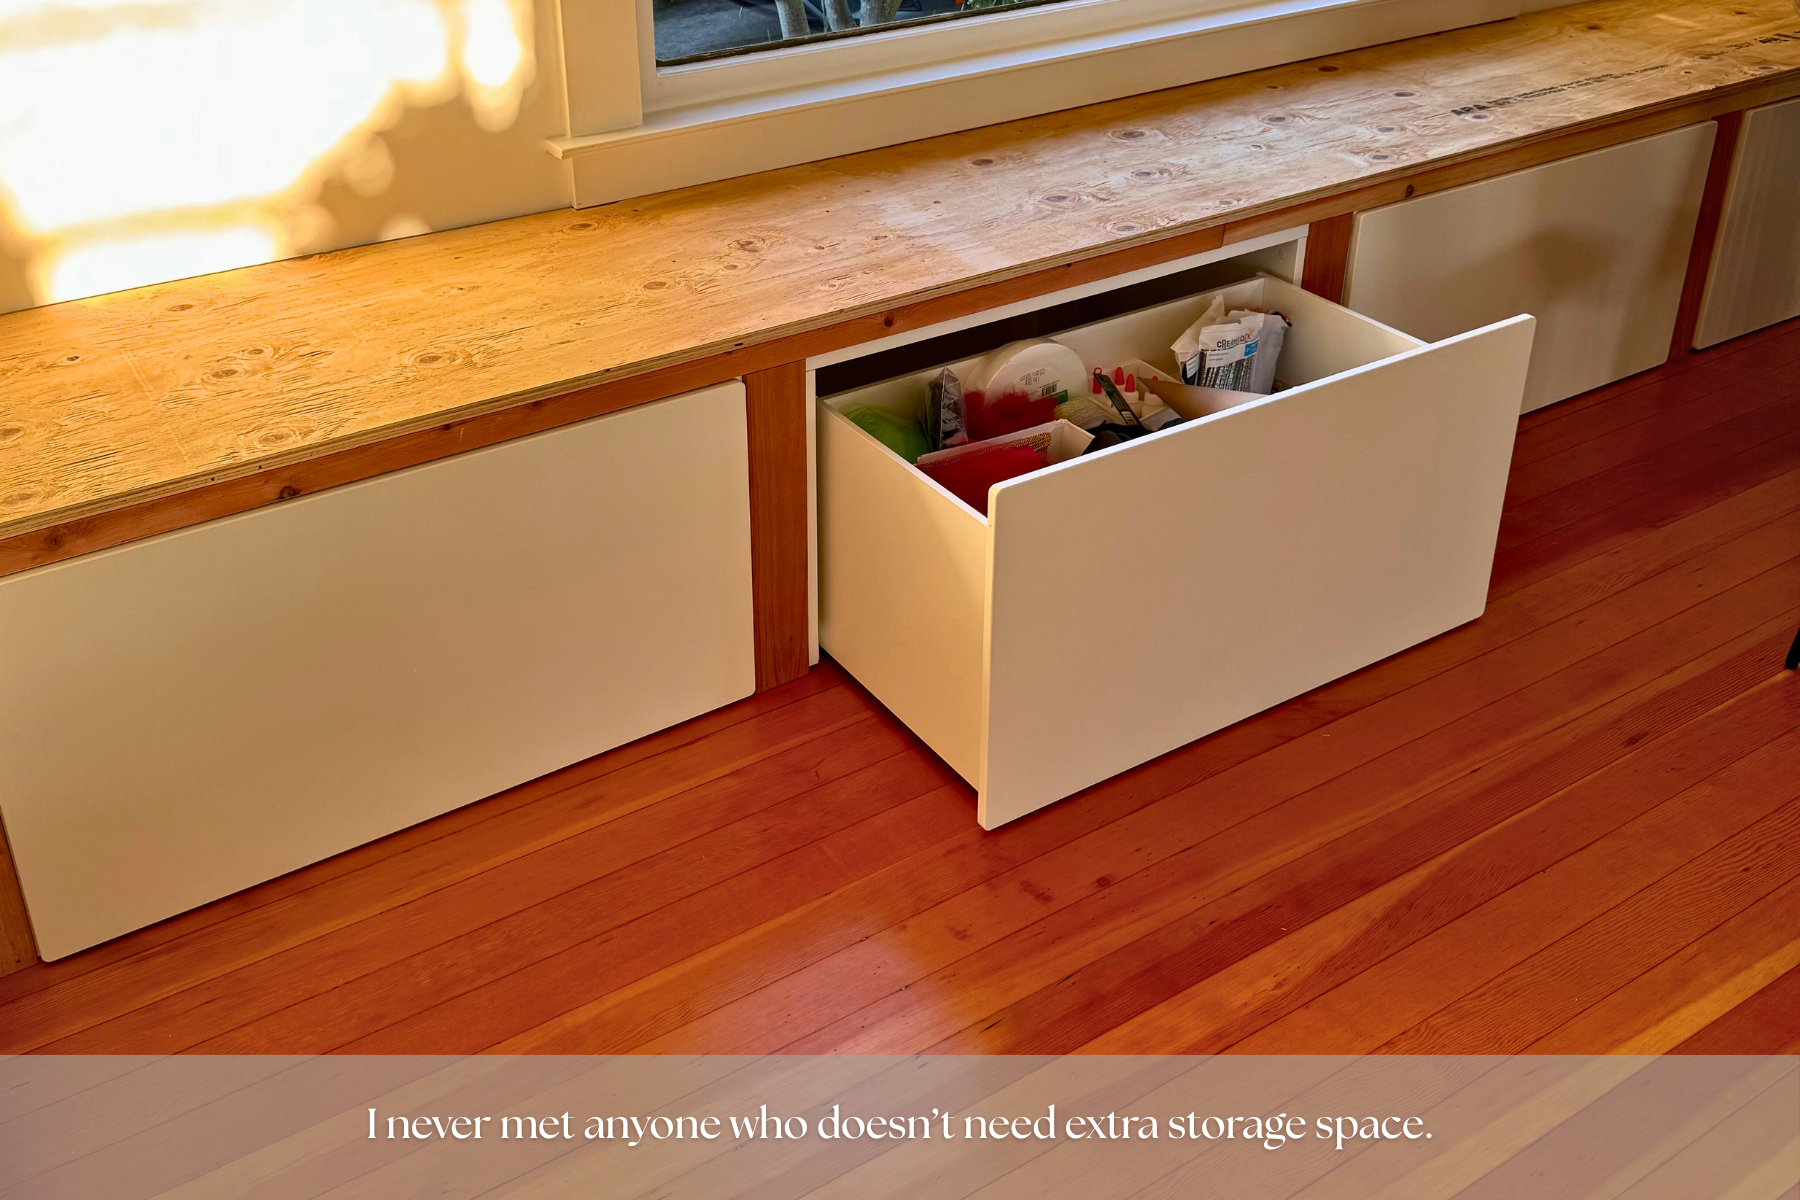
The bench will have several intentions: additional storage, additional seating, a place to hug my craft table, a cozy spot to read a book, and a space to set up a dining-scape to host larger dinner gatherings. Score!
Determining the Design as Renters
I was already researching DIY bench builds and had a gallery of IKEA kick-starters bookmarked on instagram to get us going. So that’s where we started. After feeling inspired by a few DIY designs (thanks @holymackerelhouse & @fourthhome_ ), Sean and I started our search on IKEA to find our storage solution.
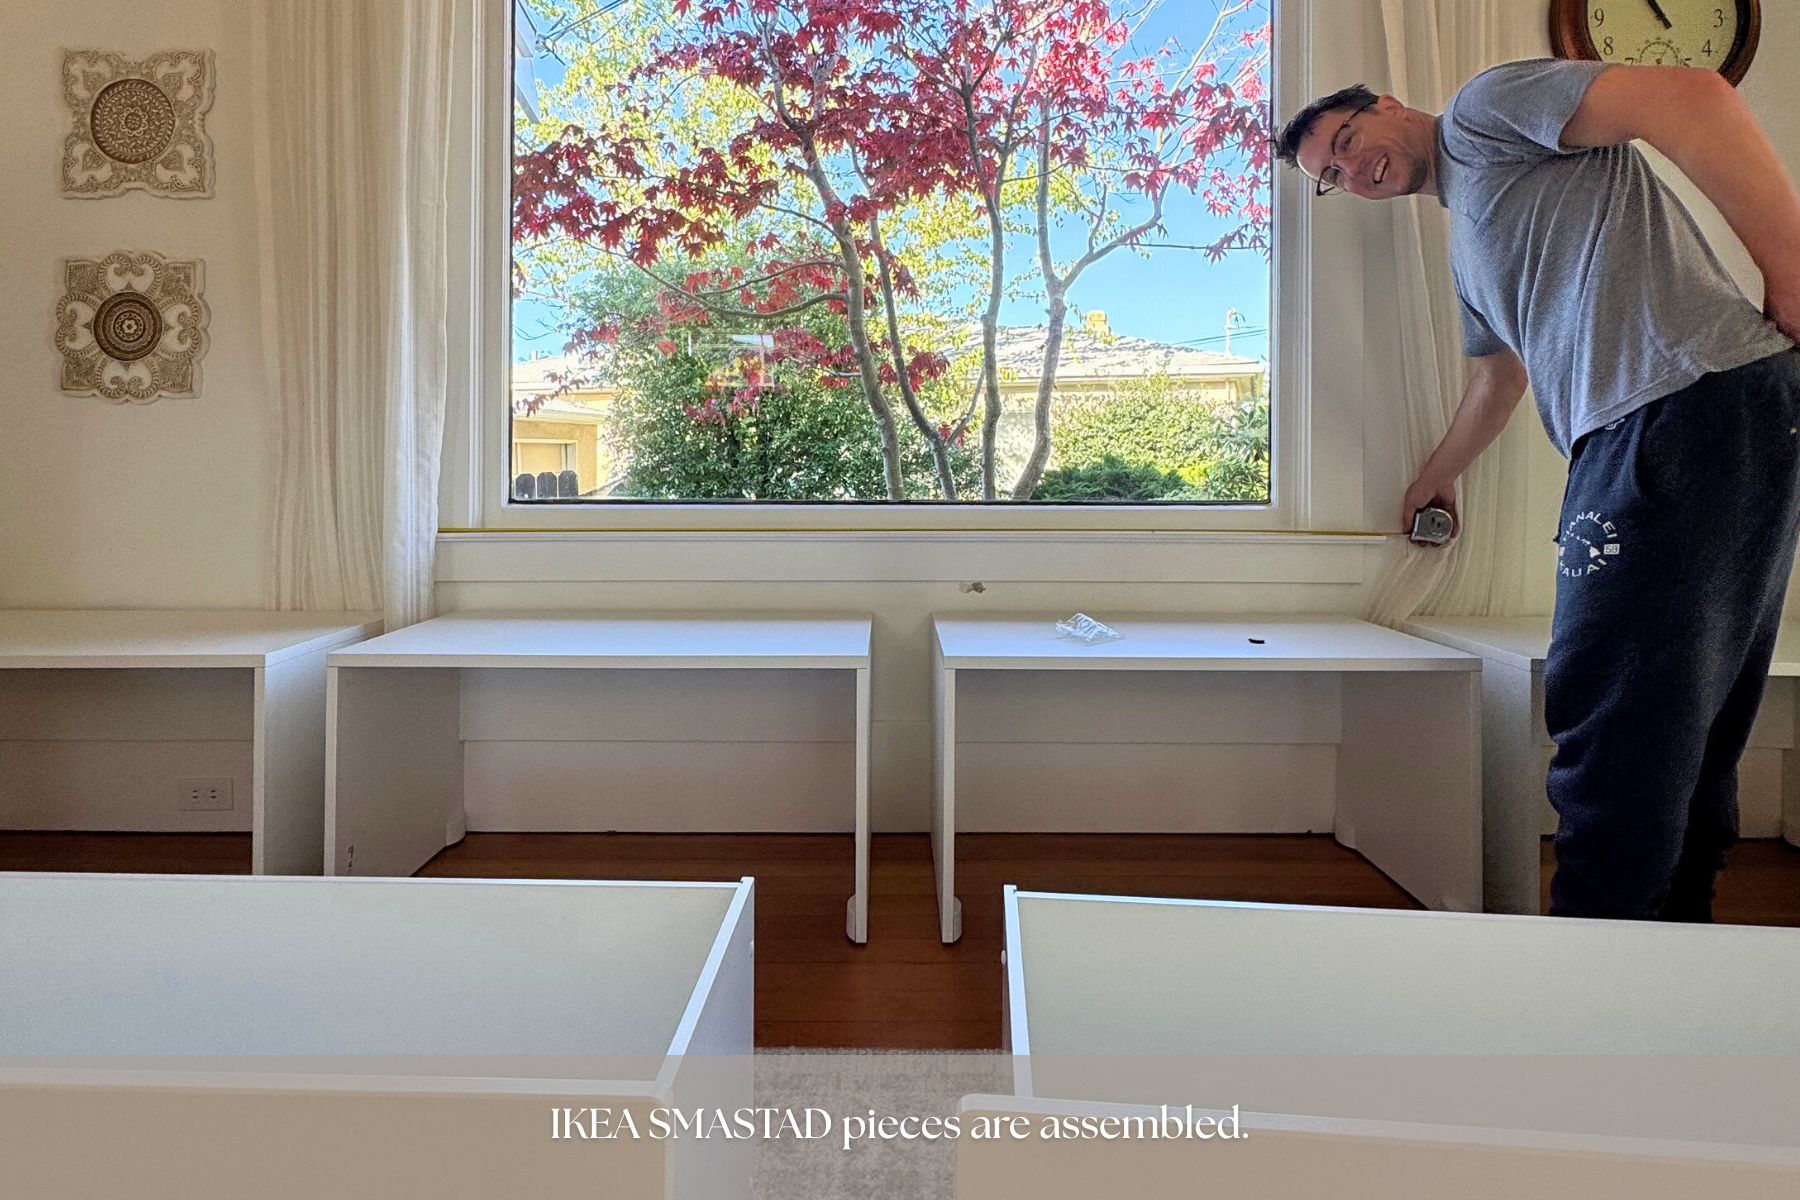
It was clear the bench needed to span wall-to-wall, not only to maximize the space, but to give it that “always-was-there” feel. We came to the decision that using the SMASTAD Bench and SMASTA Box was going to be the best fit for our space, and in fairness, our skill set. Based on the dimensions we would be able to fit 4 in the designated area. Purchase made, pick-up underway.
After we put together the 4 bench/drawer combo my handy-man got to work on gathering dimensions and mapping out a plan for the design.
Considering we’re renters, we decided it would be best if we could create a design that was structurally sound, without having to secure the bench into the wall. We were determined to create a weight bearing frame around the IKEA drawers while also making it appear as one unified piece. To do so, we started by evenly spacing out the drawers along the wall.
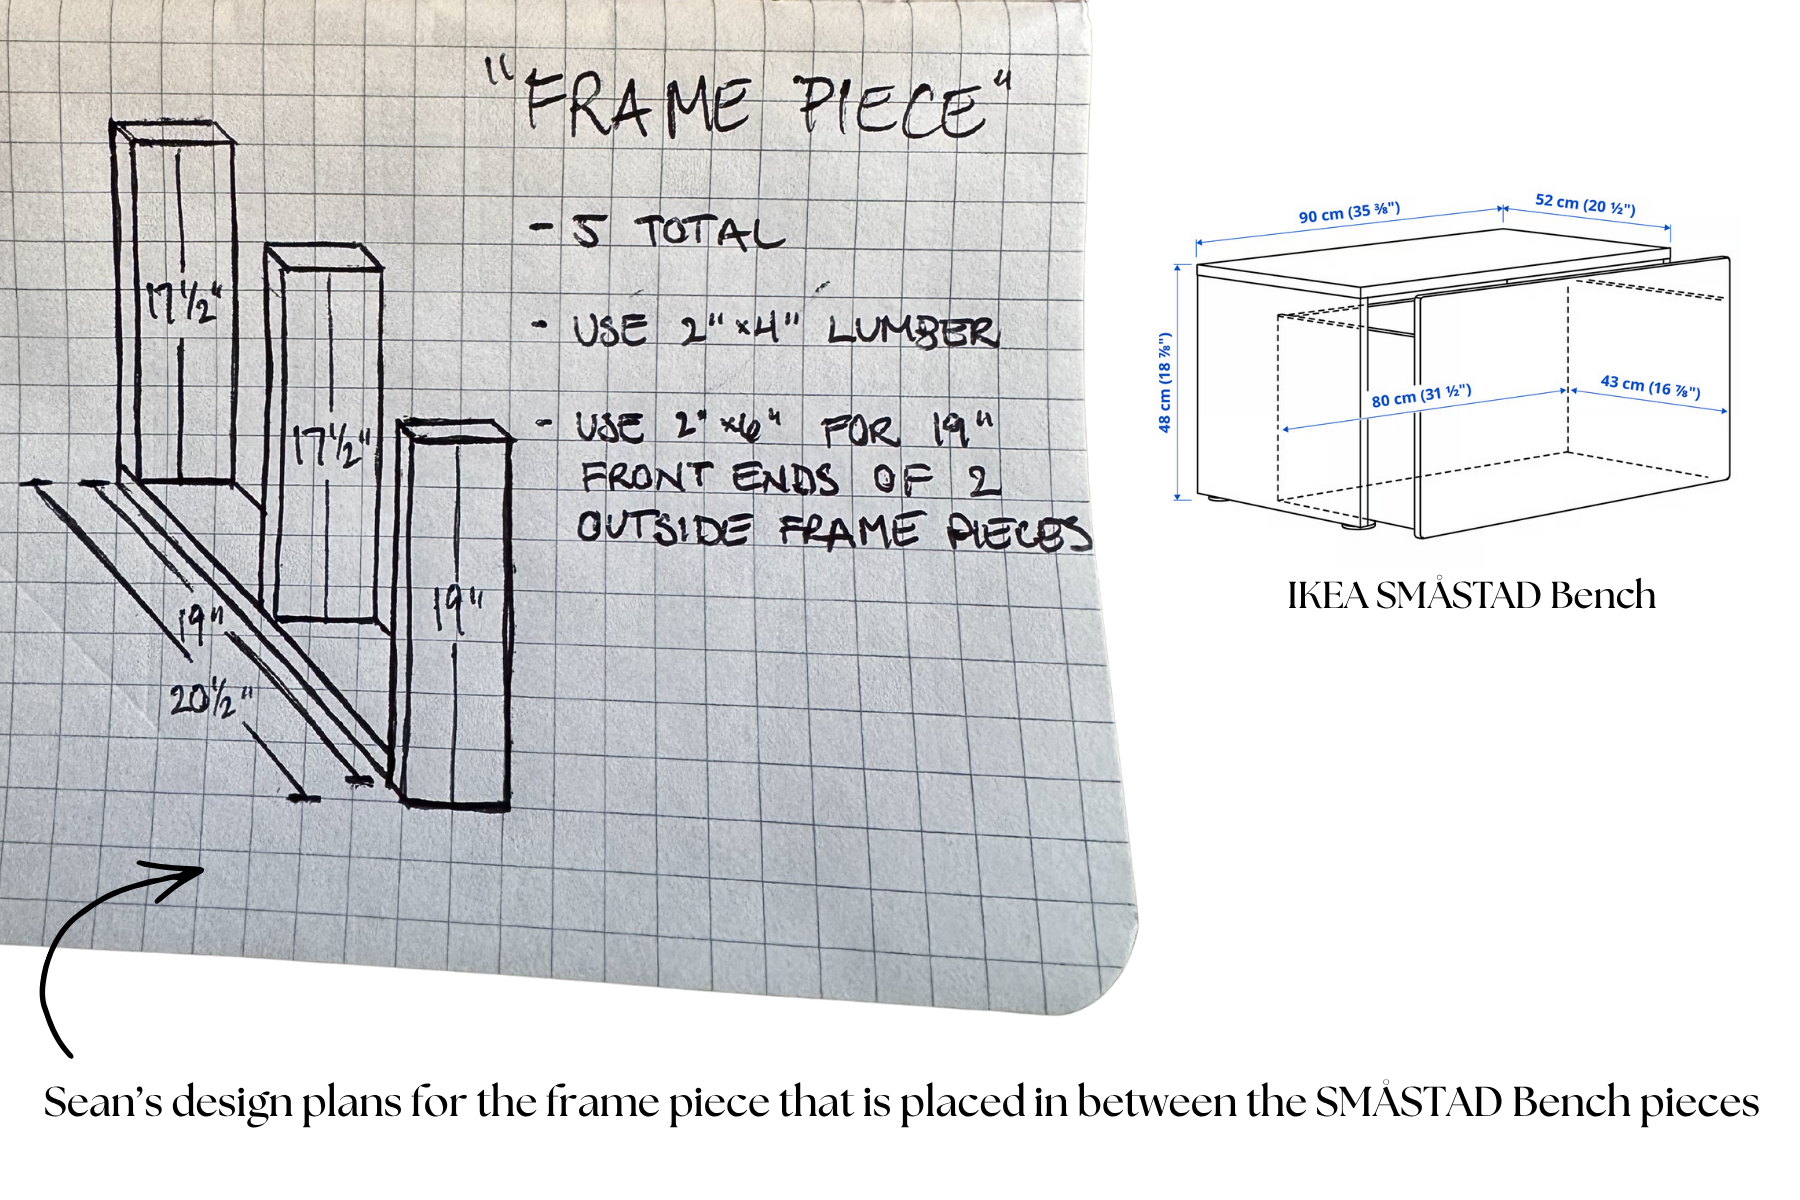
The Frame Design
Looking from the front we decided a 2x4 would be good spacing in-between the drawers (3 spots). This left a little more room on the outside between each box and wall (2 spots); therefore to account for these 2 pieces we will use a 2x6, cut to size, to account for the baseboard - making it flush to the wall.
Using that as reference we would create a frame that included an additional:
Total of 5 - 19” 2x4’s placed on the floor in between the drawers, or the drawer and the wall
Total of 10 - 17 ½” 2x4’s that stood on top of the 5 2x4’s placed on the floor
These pieces would essentially support the top frame that would prevent any weight bearing on the drawers themselves.
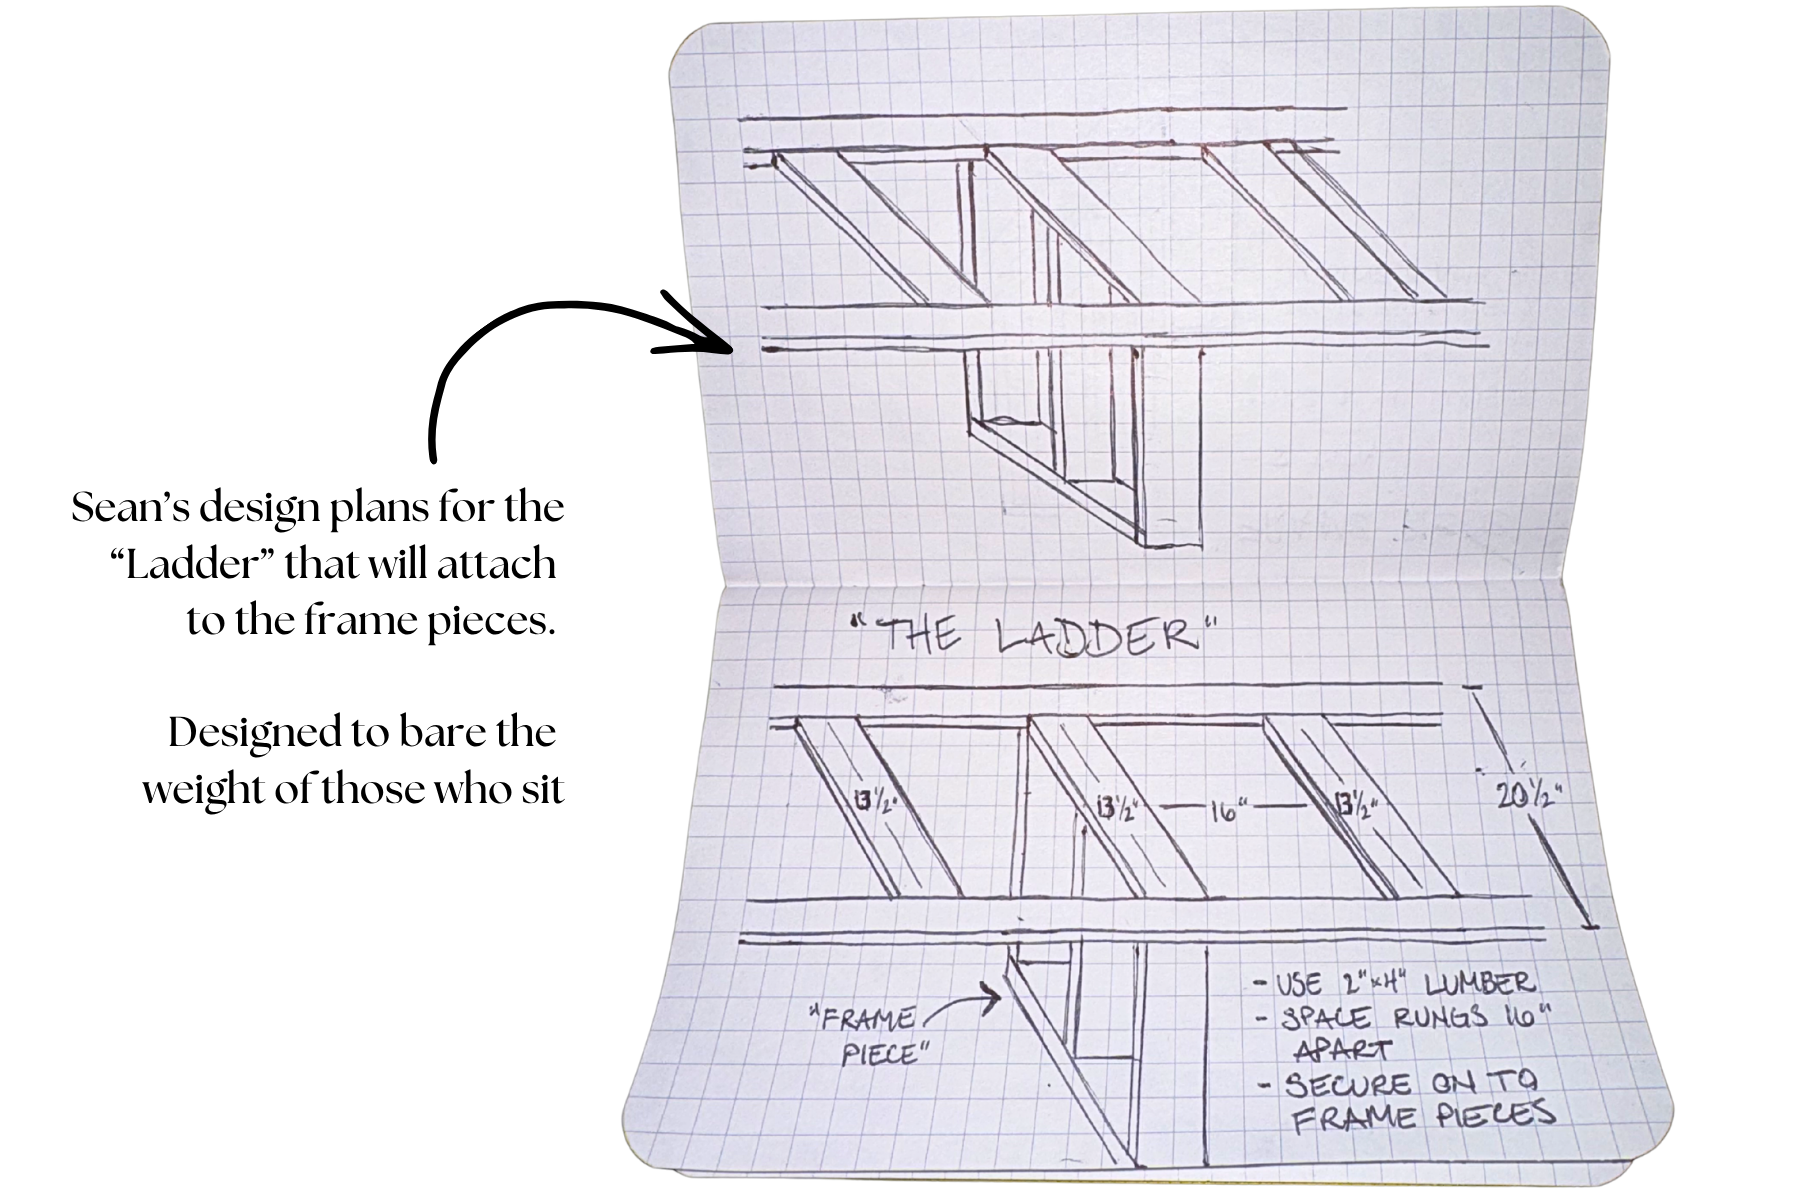
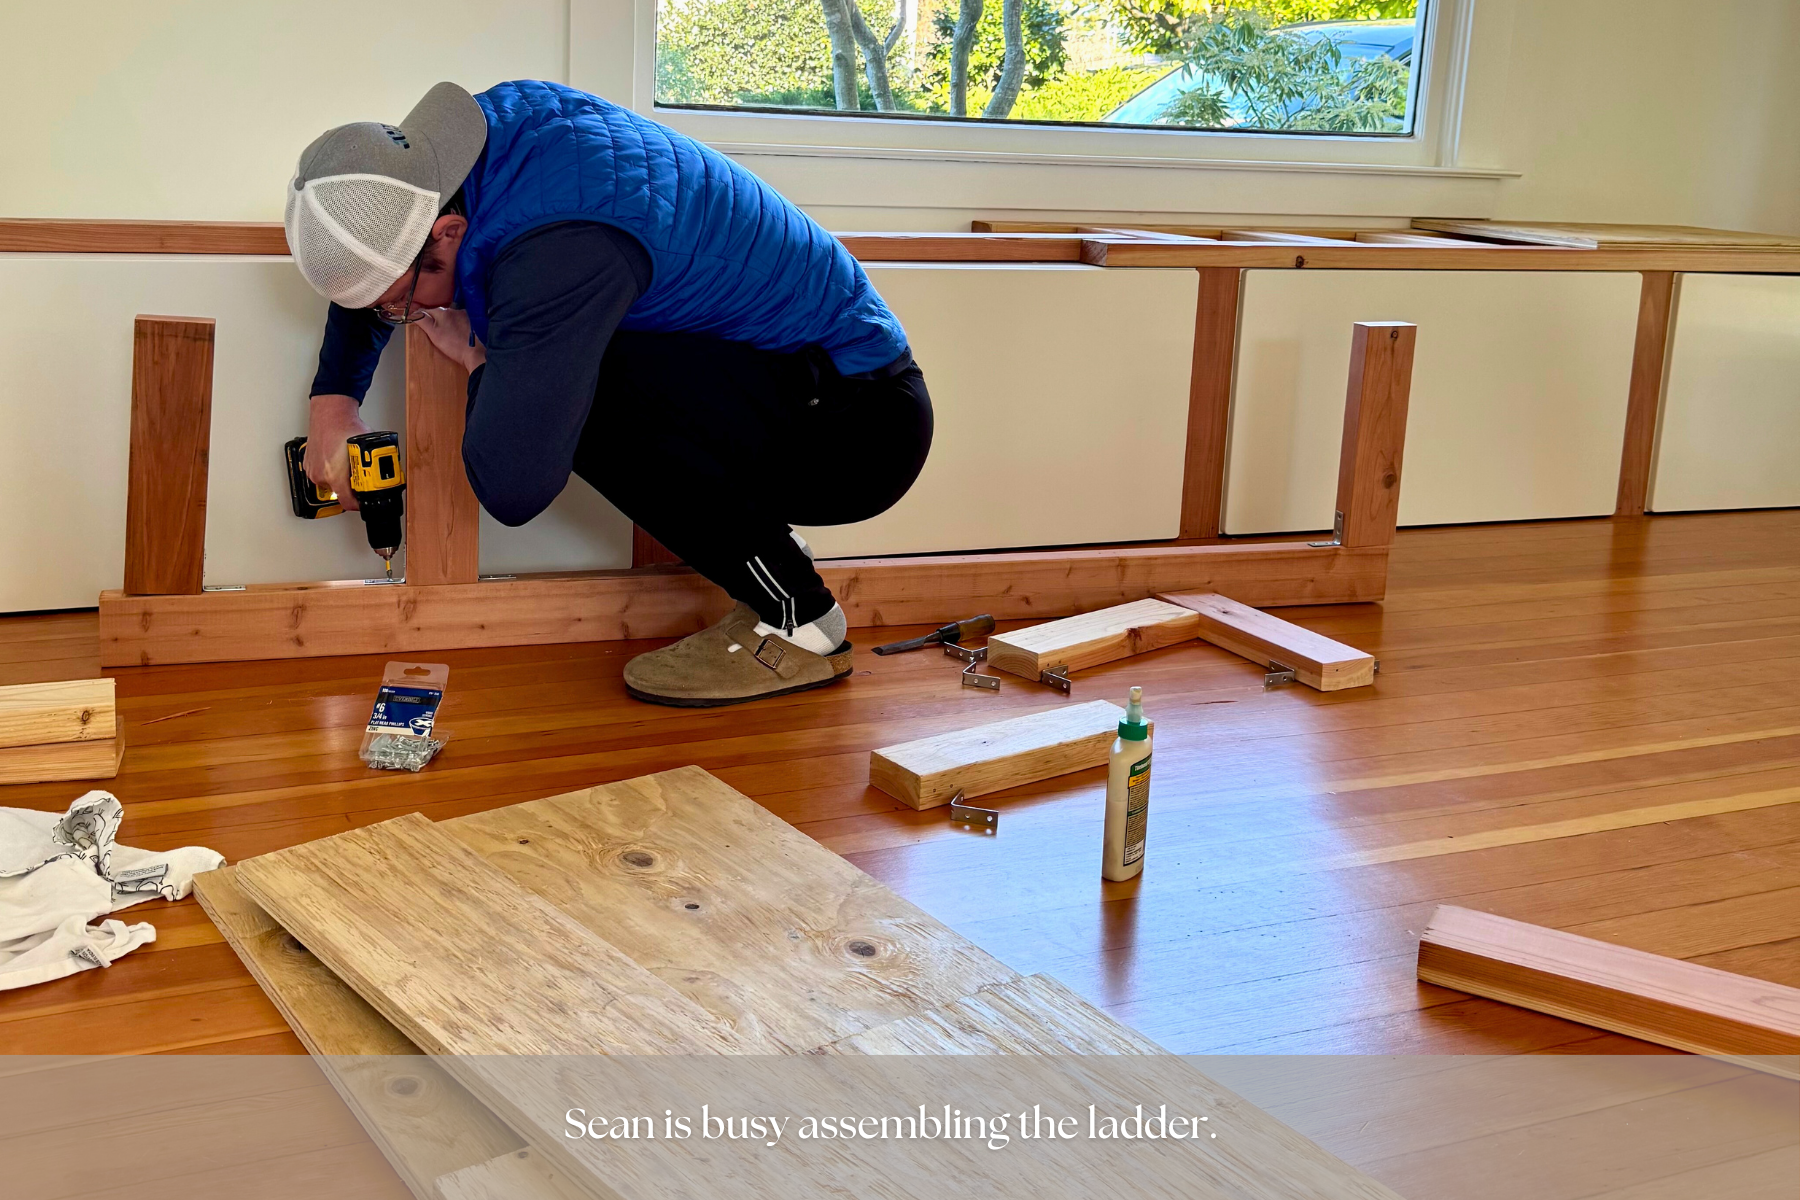
The Ladder Design
The top frame, or what we refer to as “the ladder”, needed to support the weight of multiple adults. The design included:
Running 2 2x4’s wall to wall - placed in the front and the back
In between these 2 2x4s, we would place 10 2x4’s perpendicularly; the 10 pieces would be evenly spaced approximately 16 inches apart (similar to house framing)
Next up? Home Depot to pick up that wood. We decided to purchase Pine, but truth-to-be-told a few Redwood’s snuck in. Unlike Taylor, they were hard to see.
Build Baby, Build!
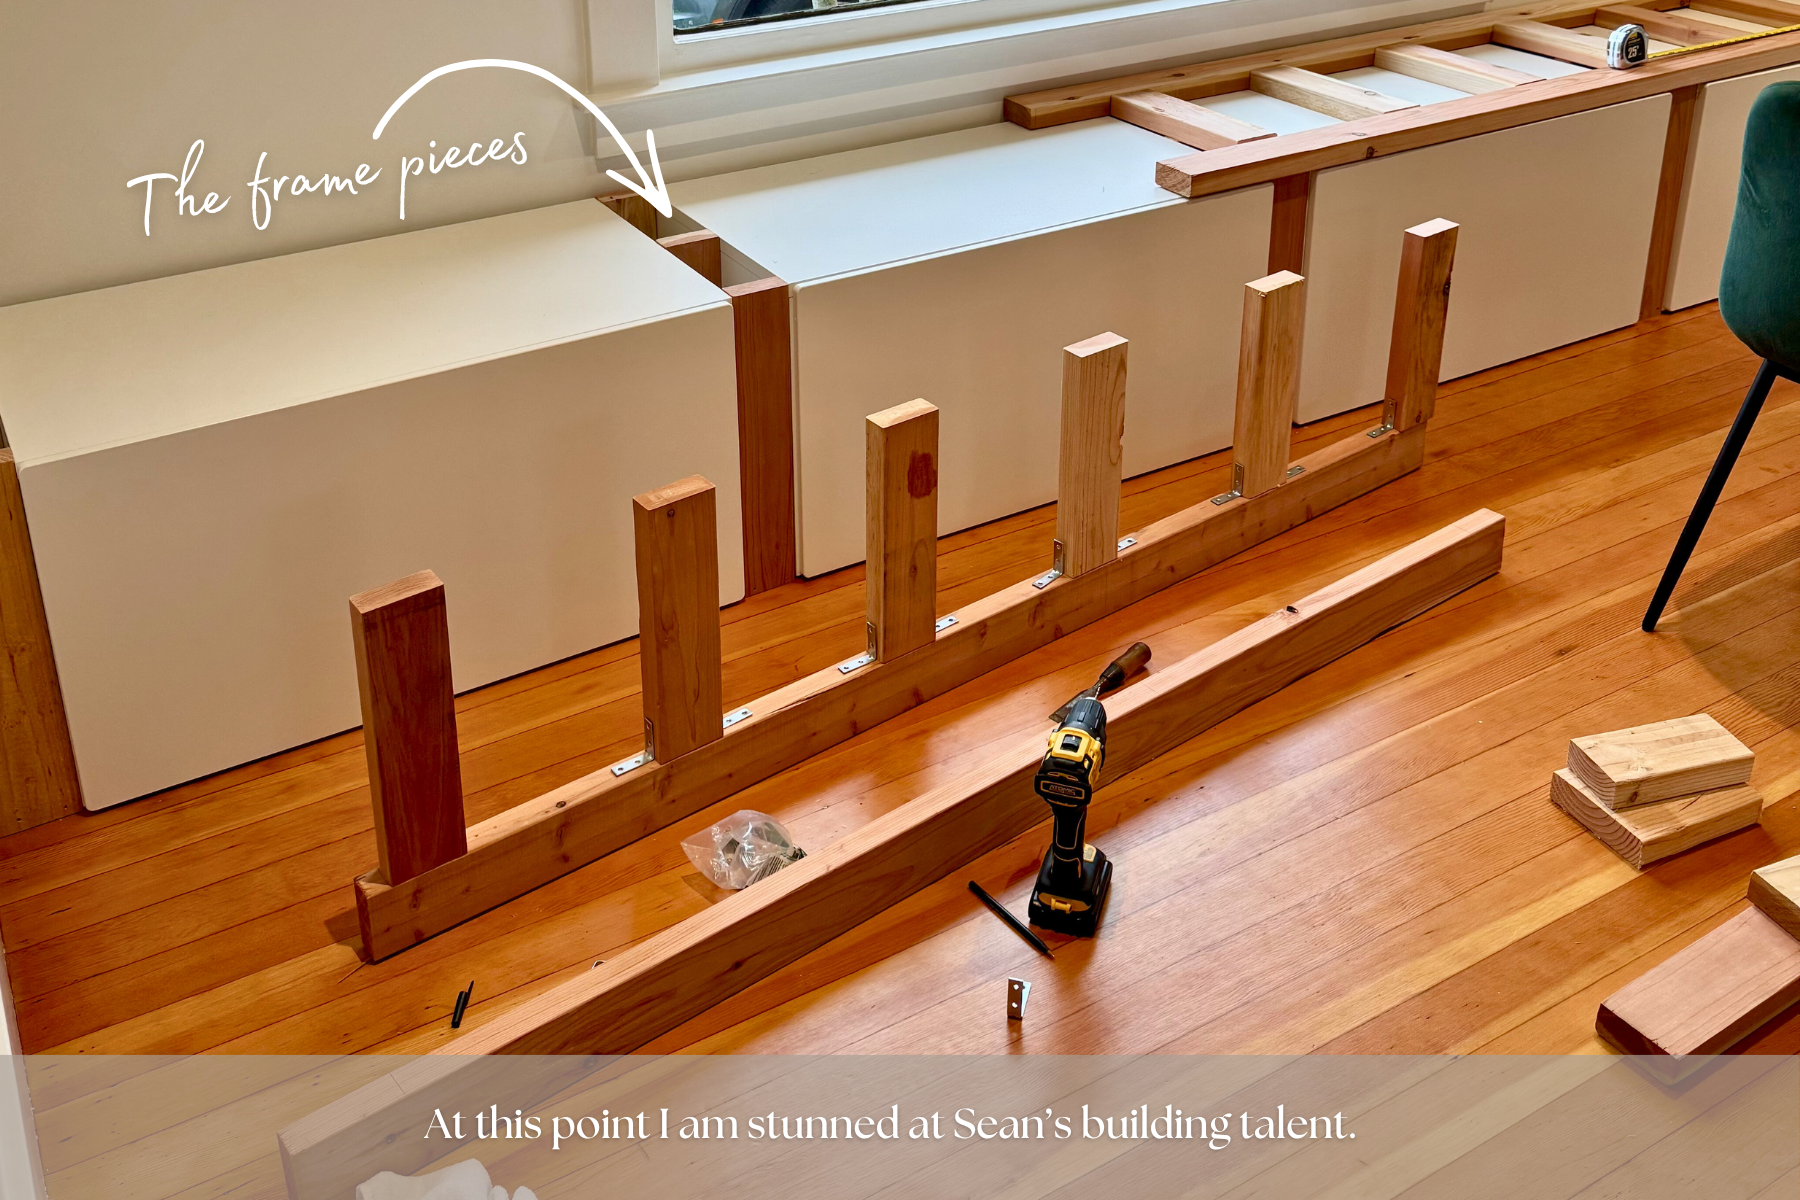
Once Sean completed making all the cuts, he began framing the floor portion.
When Sean was working on the cuts for the 2 pieces that would be placed between the box and the outer wall he ran into a little problem. Old houses, new problems. Because the house had been painted so many times, the top of the floorboard was angled. While Sean’s original measurement was accurate, the front of the baseboard distance to the floor was not the same as the back of the baseboard distance to the floor. Therefore Sean needed to sand down areas of the 2x6 to make it as flush as possible.
Next, we secured the 2 pieces that stood vertical in between the drawers or drawer and wall. Remember that these pieces (total of 10) stand on top of the 2x4’s placed on the floor. We used #9 x 3” exterior wood screws to secure the pieces together by drilling through the floor piece into the standing piece. 2 screws per standing 2x4.
To accomplish a more aesthetic appearance by avoiding visible screws for the 5 front pieces, we secured these front pieces to the floor pieces using a 2” corner brace with 4 #6 x ¾” flathead screws. However, during this process we realized this caused the front pieces to angle slightly backwards. To correct it, we drilled 2 #8 x 2” finishing screws in the bottom of the front piece to not only create a flush fit of 90 degrees, but also minimize its appearance.
After repeating this process 5 times, and admiring our work, it was time to move on to building “the ladder”.
Budget Friendly
Though Home Depot offers longer 2x4 pieces, and we could have bought a 24’ piece which would have ultimately eliminated seams, and perhaps would have made the bench even more structurally sound, we decided to go a more cost effective route.
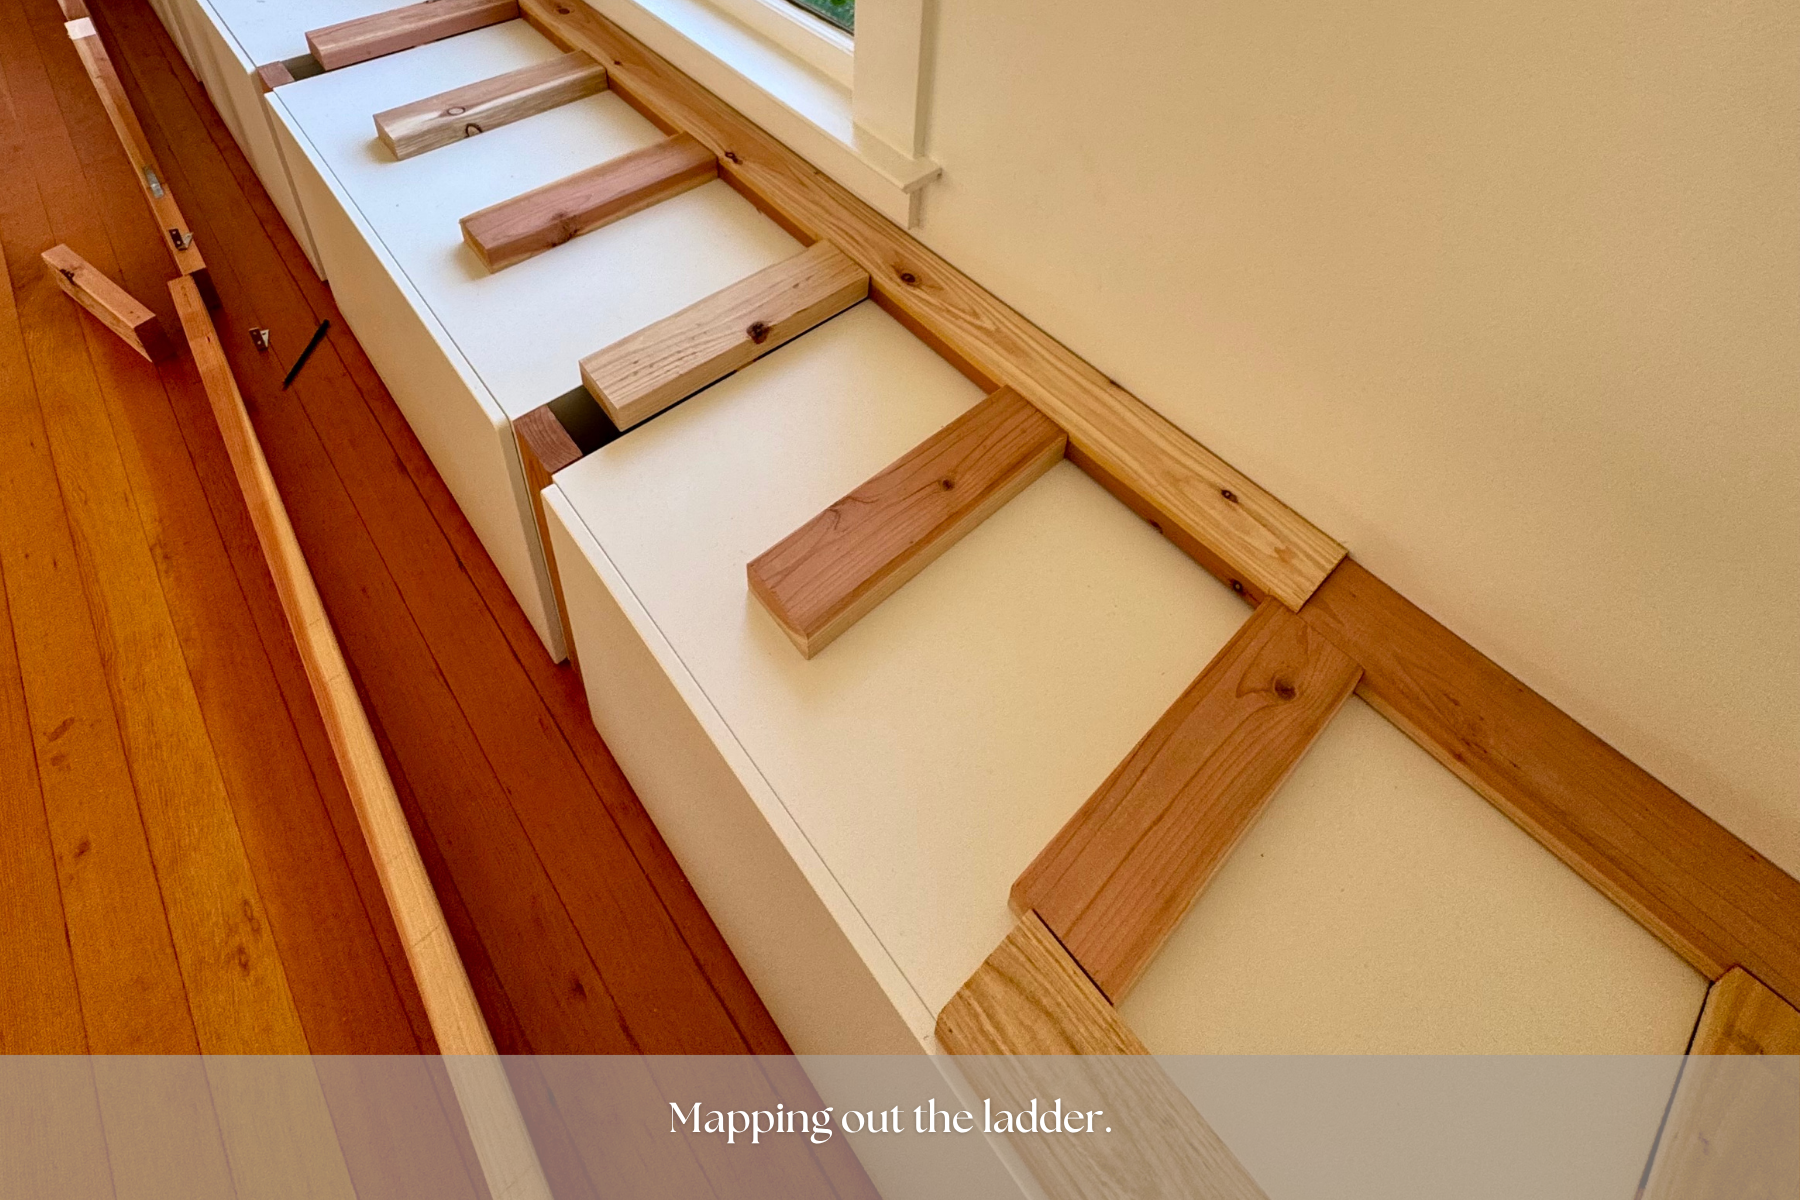
Instead, we bought 5 6’ 2x4’s. We were able to use 2 full pieces in the front, and 2 full pieces in the back, but needed to cut the remaining 5th 2x4 to fill the remaining gaps. These pieces make up for the two longer bars of the ladder. To provide support at the seams, Sean wanted to place a crossing (perpendicular) piece which shifted our initial plan of 10 evenly spaced pieces, approximately 16 inches apart. Certain crossing 2x4’s had to be secured to the floor frames, while the rest of the crossing 2x4’s were evenly spaced out between frame and seam.
Each corner of the perpendicular piece was secured to the longer bar with a 2” corner brace and 4 #6 x ¾” flathead screws. This eventually sent Sean back to Home Depot to get more braces - his math wasn’t mathing.
[Lesson learned - As suggested on the corner brace directions, Sean was taking time to mark the brace holes to pre-drill. Half way through the process Sean scrapped this step as he found it unnecessary. The bit would often jump and not necessarily be exactly center or where the mark was desired, which made the braces a little bit off angle. Instead he drilled the flathead directly into the wood.]
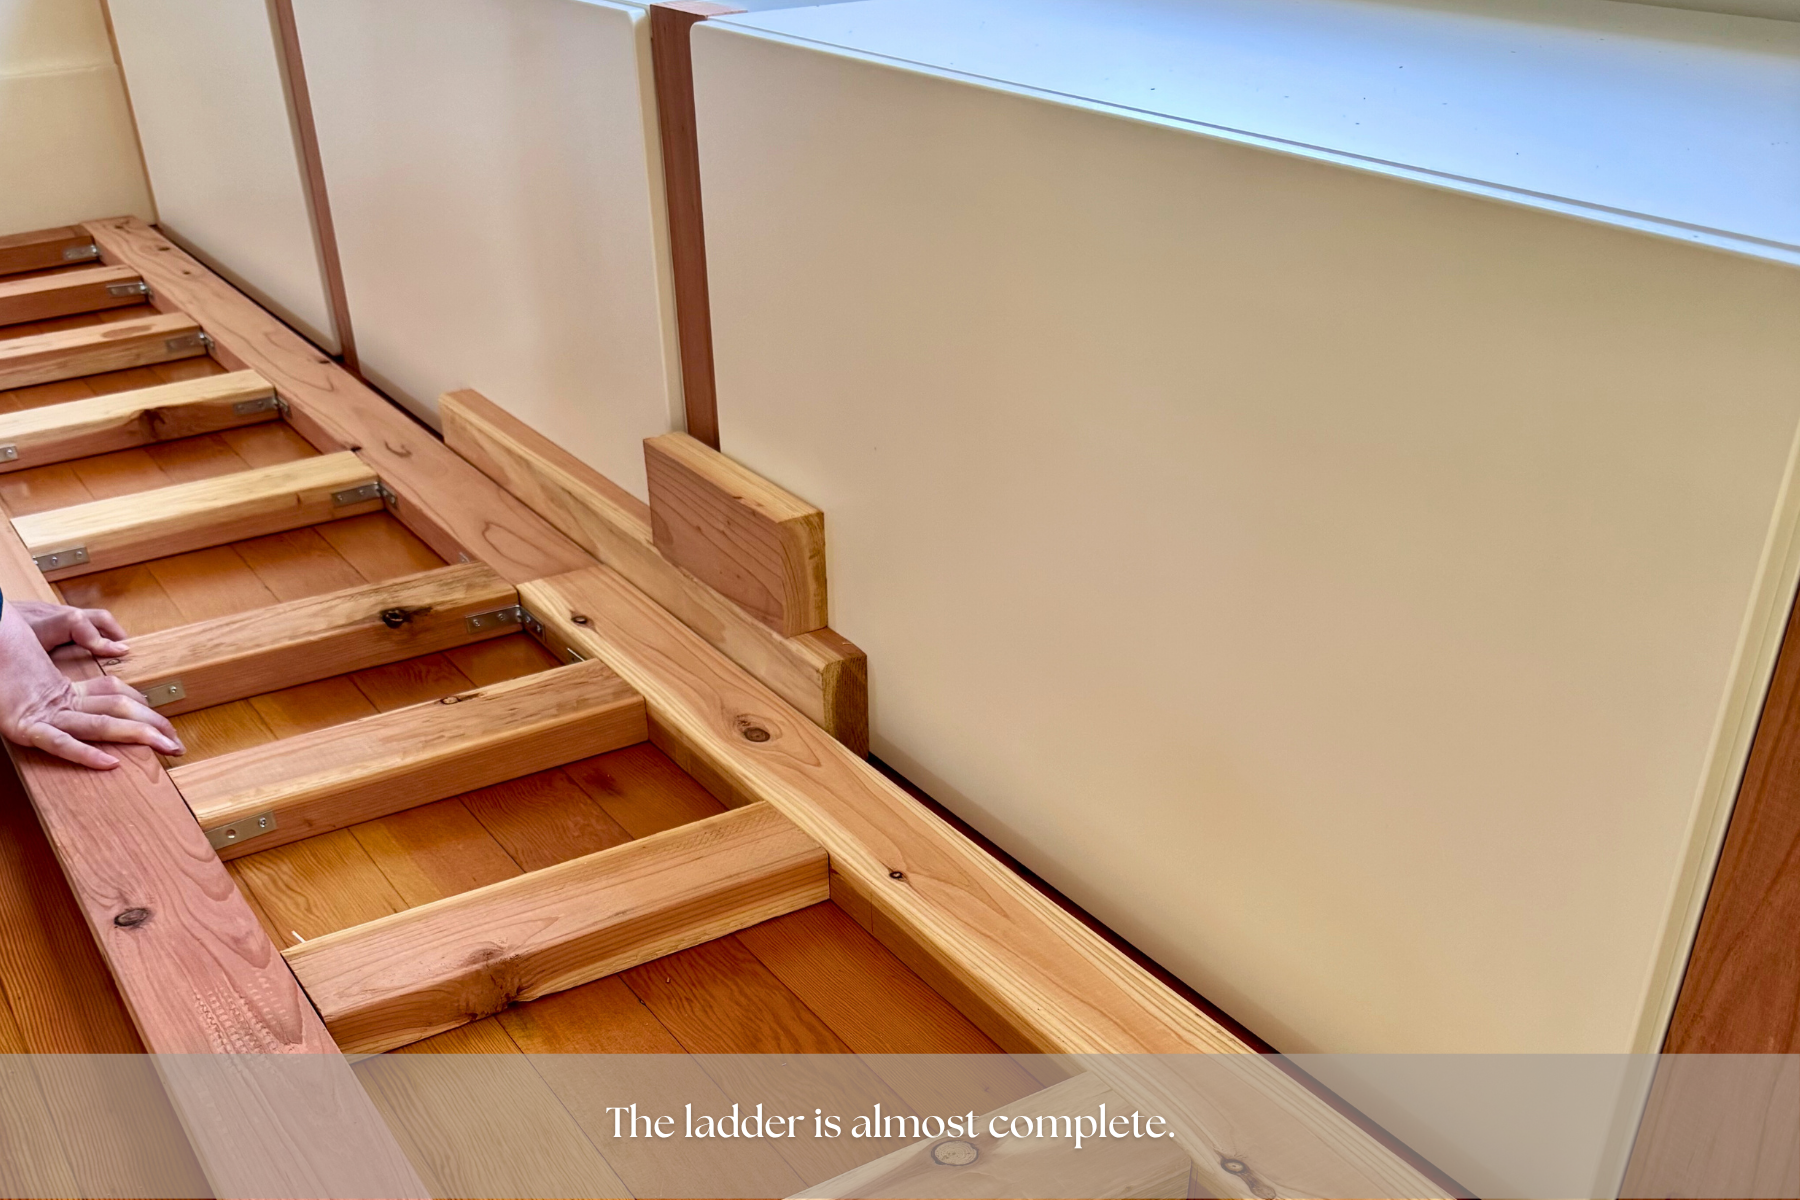
Once the “ladder” was complete, we positioned it onto the floor frame and secured the pieces together using #9 x 3” exterior wood screws. It was then time to head back to Home Depot and purchase plywood for the top piece. We settled on buying 4 x 8 ¾” plywood which Home Depot cut to size.
Time to Finish
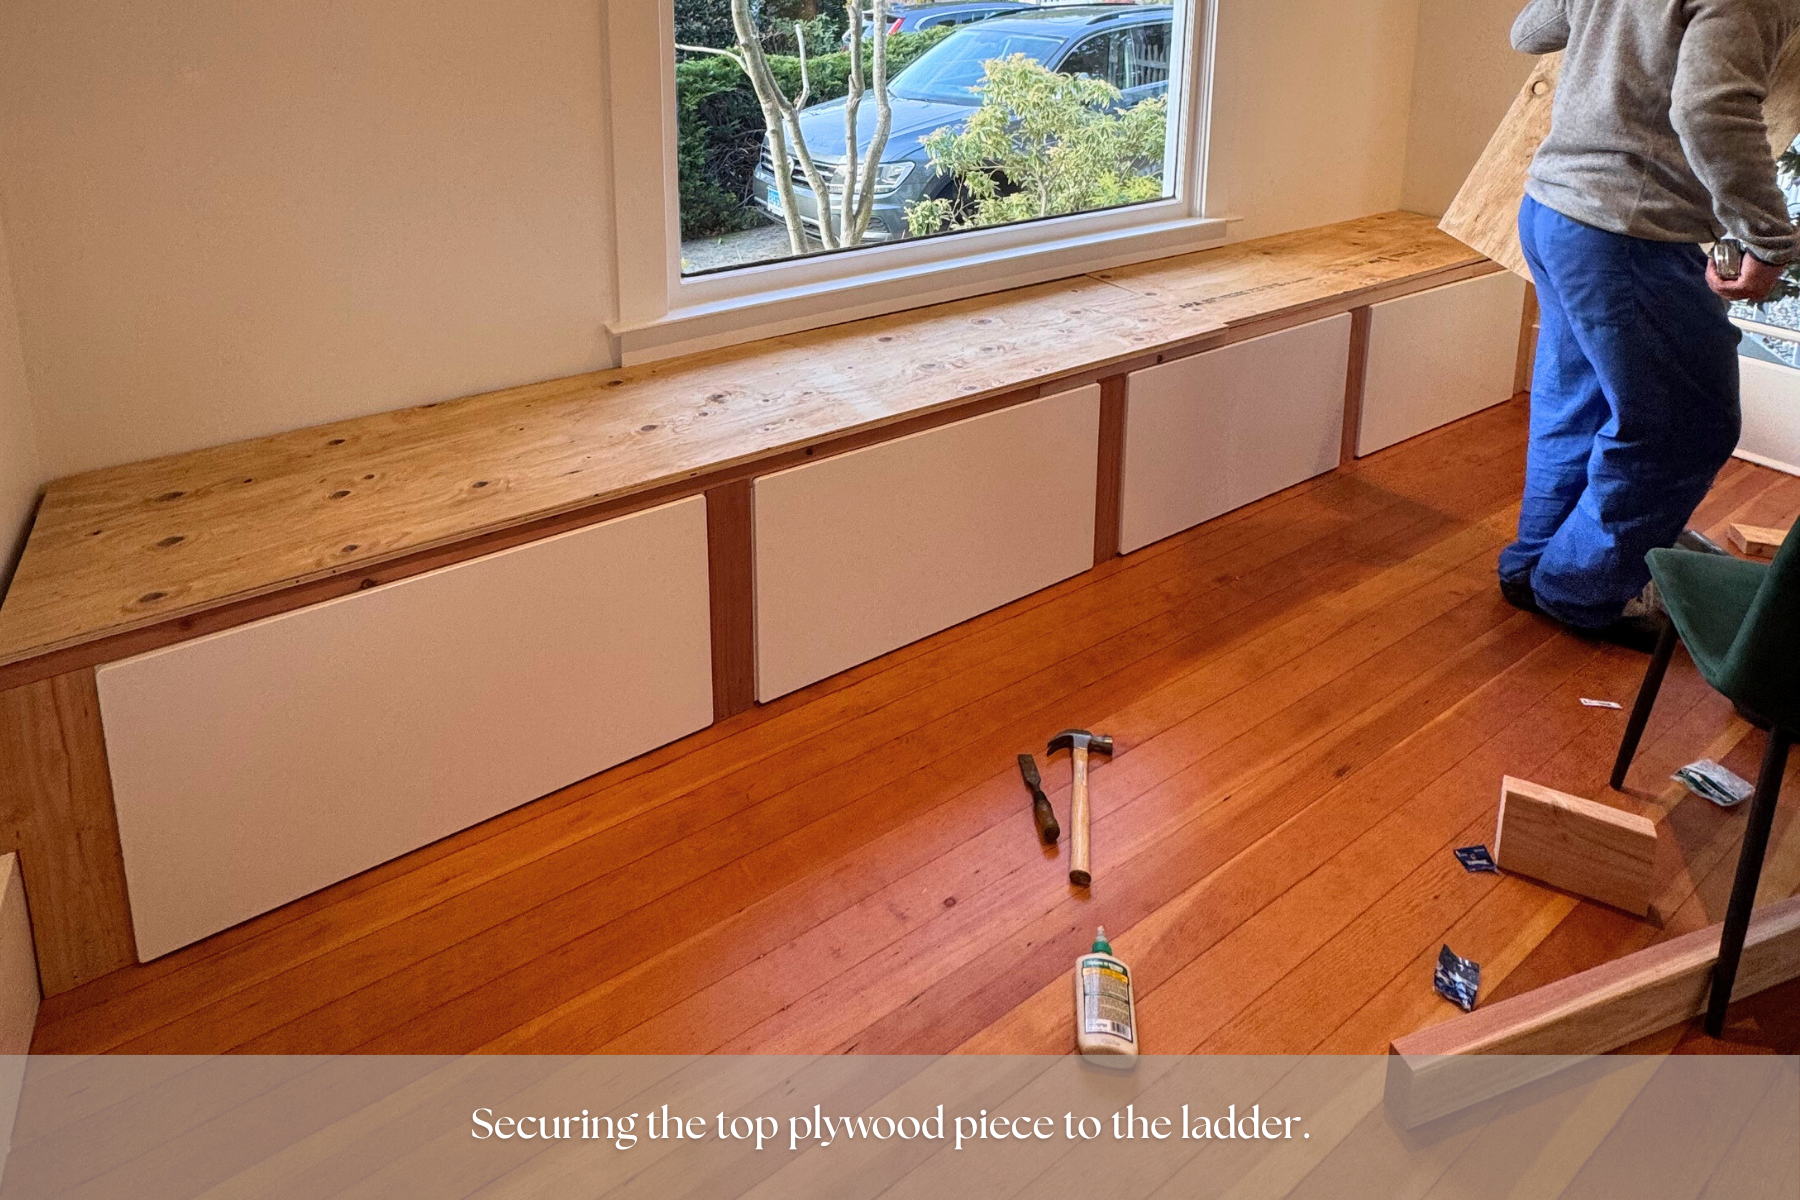
Unfortunately, I gave Sean the wrong measurements upon purchase, so the plywood for the top piece ended up being short to make it flush wall-wall. From our remaining scraps, Sean cut a piece (no bigger than an inch) to fill the gap to appease me . Once things were fitted properly, we secured the plywood using #8 x 1-½” finishing screws at all joists and seams. The bench was then lightly sanded with focus on rounding the plywood edge with 120 grit.
Paint Prep with a spotlight on IKEA -
Referencing back to @holymackerelhouse & @fourthhome_, I wanted to make sure that our DIY build seamlessly unified with the IKEA furniture. Following their recommendations, we lightly sanded each IKEA drawer using 220 grit followed by a thorough wipe down. Next, we applied a BIN primer to not only the IKEA drawers but also to the bench. Once the primer was dry we went back and sanded the pieces using a 400 grit and repeated with a good-ole wipe down.
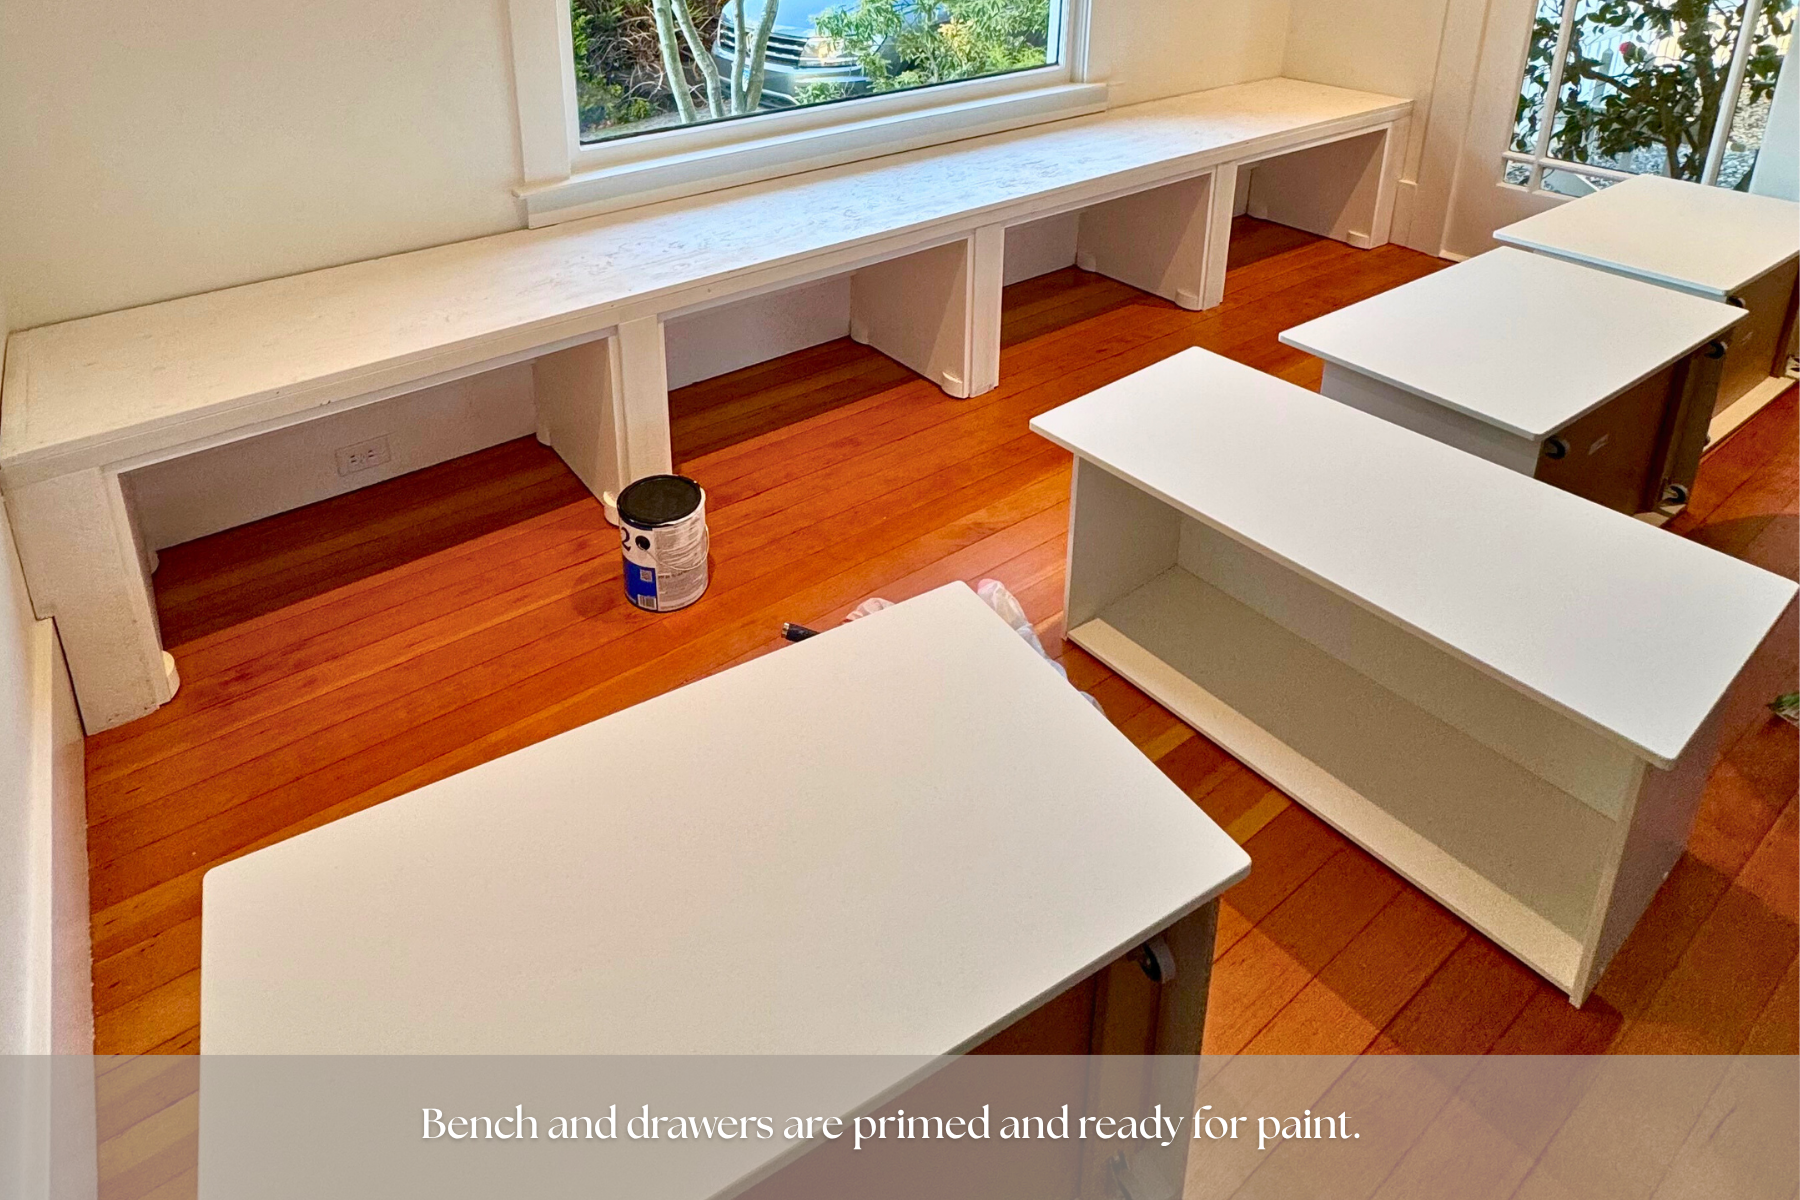
We were ready to paint.
One thing I appreciate about Sean is that he genuinely likes to be involved in the design and style choices. Though that's not to say we always agree. I would describe Sean’s style preference as traditional, simple & modern - where I seem to fit more in the eclectic, vintage with modern touches realm. It has been interesting to see how we can meld our styles together with the challenge of also honoring the original charm of our cottage rental. Is Sean bullied into design choices on occasion? I can’t deny or confirm.
Which brings me to our next task -
Choosing a Paint Color for the Bench
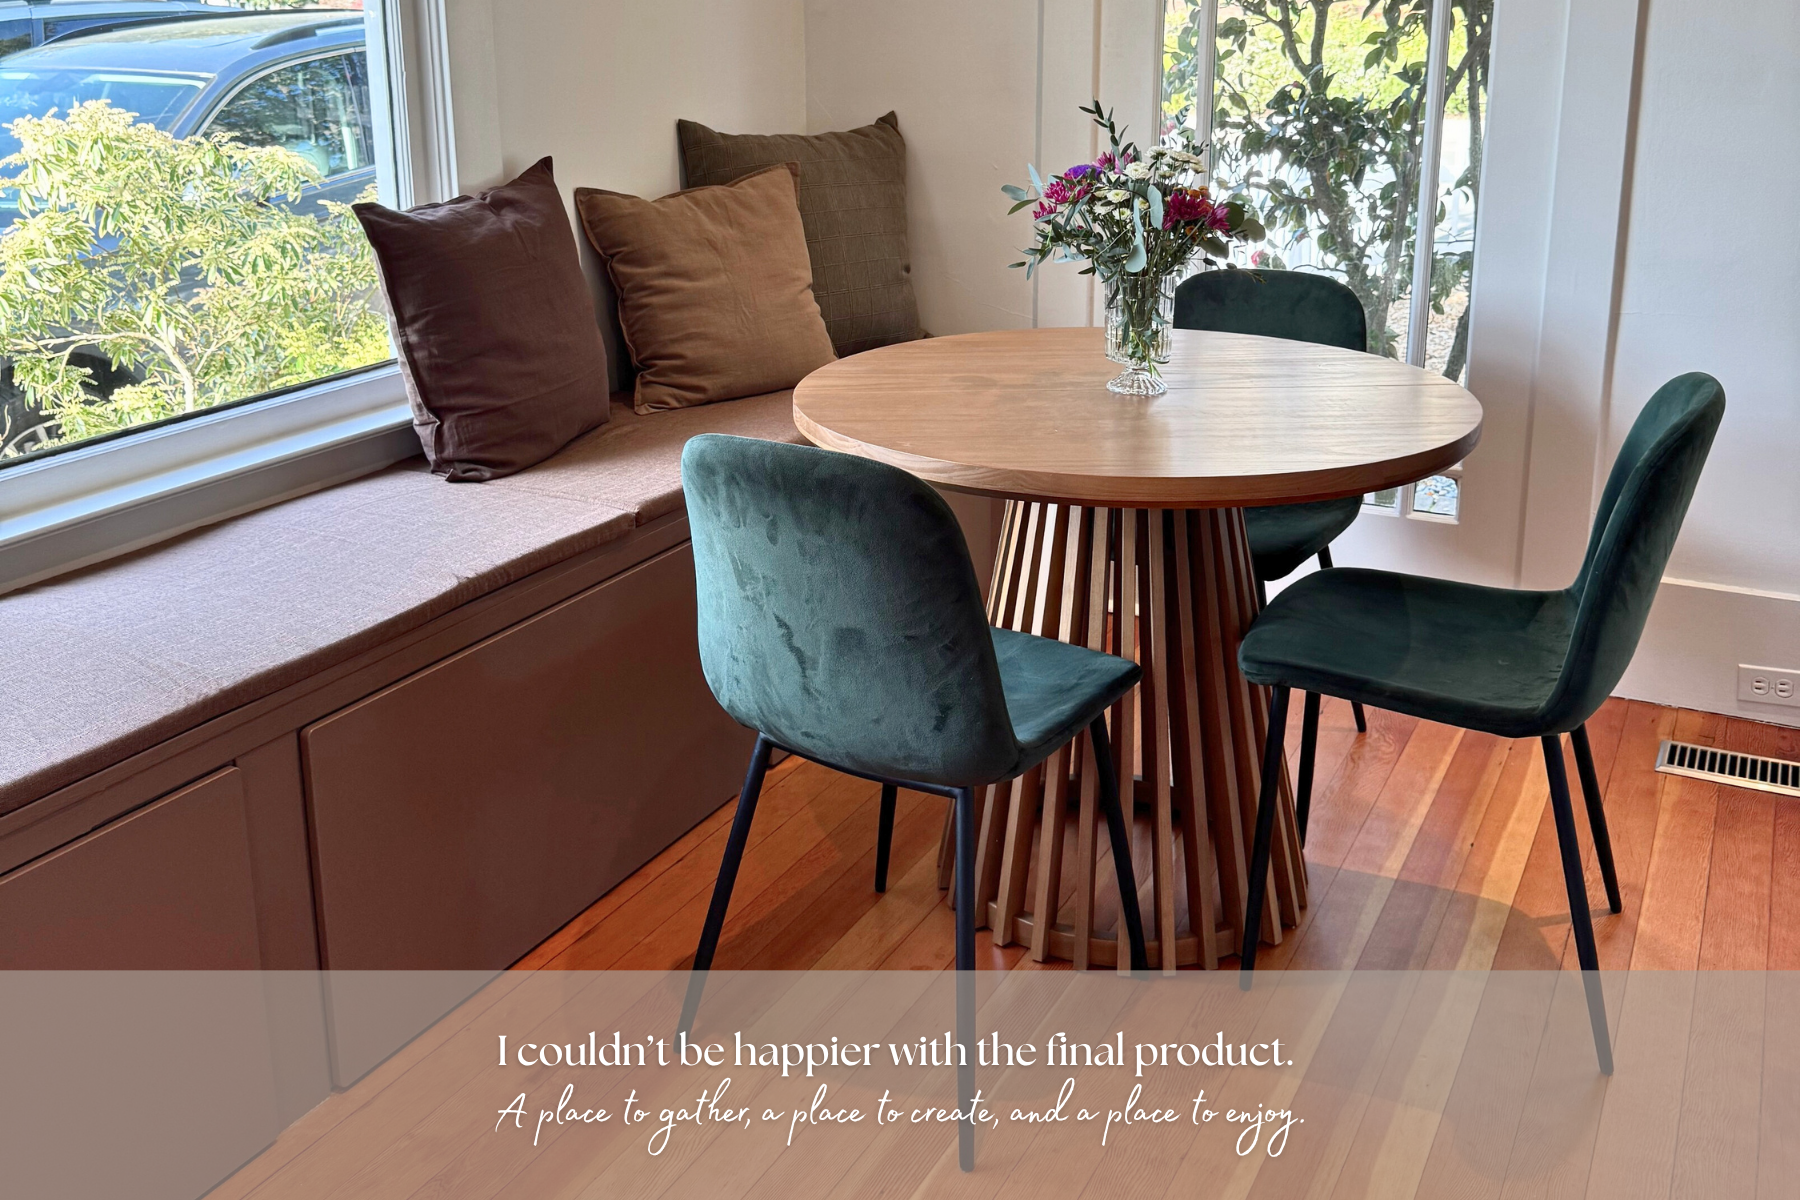
I wanted to paint the bench a deep chocolate brown, where Sean was leaning towards a beige color. The other side of the room was living in a sea of green and I was eager to draw out a shade of brown from the carpet. My intention was to connect the spaces while also ensuring they could stand alone beautifully. Somehow I settled for Aged Beige by Behr. After completing a second coat, we both agreed the color did not provide enough contrast between the walls and the bench. Back to the paint swatches we go.
At this point our custom seat cushions for the bench top arrived and I was determined to color match. After a few days of trialing various swatches to determine how they looked in different parts of the day, we both agreed on “Quartersawn Oak” by Sherwin Williams.
What’s Next?
I could not be more proud of our first DIY build. Even though there were moments where we questioned everything - the final result is so worth it. Next we will layer in a rug to soften the wood floors, add sconces for warmth and mood, source thoughtful second-hand/vintage furniture to add charm, and style decor that makes it feel like us.